To ensure that infrared sensors effectively detect wildlife and trigger the camera, you need to consider the sensor's operating principles, device settings, and installation techniques to ensure accurate target capture and minimize false triggers. The following detailed procedures cover preparation, core settings, installation, and debugging.
Preliminary Preparation: Identify Core Device Components and Compatibility Requirements
Before use, confirm the compatibility of the infrared sensor and camera to avoid triggering failures due to hardware incompatibility.
Core Component Inspection
Confirm the camera's infrared sensor type: Passive infrared sensors (PIR) are the most common (triggering by sensing the temperature difference between the animal's body temperature and the surrounding environment, suitable for wildlife monitoring). Active infrared sensors are also a minority (emit infrared beams, which are easily blocked by vegetation and are only recommended for open areas without vegetation). PIR sensors are preferred. Check sensor parameters: Pay attention to the detection distance (typically 20-35 meters, adjust based on target size, e.g., 10-15 meters for small rodents, 25-30 meters for large animals), detection angle (90°-120° is ideal; too narrow an angle can lead to missed shots, while too wide can lead to false triggers), and trigger sensitivity (high, medium, and low are selected by default, and can be fine-tuned based on the environment). Preparing Accessories
Power: Power supply: Choose according to the monitoring cycle. For short-term monitoring (1-2 weeks), use high-energy alkaline batteries (e.g., 8 AA batteries). For long-term monitoring (1-3 months), use a solar panel (ensure the installation location receives ≥4 hours of sunlight per day).
Storage: Insert a high-speed SD/TF card (32-128GB, Class 10 or higher recommended to avoid video freezes caused by insufficient storage speed).
Securing Tools: Cable ties with waterproof covers, metal brackets (suitable for tree trunk mounting), and ground brackets (suitable for grassland/open areas) to prevent camera shake from affecting sensor detection.

Core Settings: Improving Trigger Accuracy through Parameter Adjustment
The triggering performance of the infrared sensor depends primarily on the camera's parameter settings. These should be adjusted according to the monitoring target and environmental characteristics to minimize missed and false positives. Trigger Sensitivity and Distance Settings
Adjust by target size: When monitoring small animals (such as squirrels and hares), set the sensitivity to high and the detection distance to 10-15 meters (to avoid false triggering due to distant movement). When monitoring large animals (such as deer and bears), adjust the sensitivity to medium-high and the detection distance to 20-30 meters (to ensure triggering as soon as the target enters the range).
Adapting to special environments: In rainy or foggy areas, as moisture weakens the infrared signal, reduce the distance by 10%-20%. In dense vegetation, lower the sensitivity appropriately (to avoid triggering due to swaying branches and leaves), and enable "Animal Filter Mode" (supported by some cameras, this uses AI recognition to exclude non-animal heat sources).
Shooting Mode and Trigger Delay Settings
Photo Mode: Ideal for recording animal species and numbers. We recommend setting the burst mode to 3-5 shots (to avoid blurry single shots) and an interval of 5-10 seconds (to prevent repeated shots of the same target and waste memory). Video Mode: Ideal for observing animal behavior. Choose 1080p resolution (balancing clarity and storage capacity), with a duration of 10-30 seconds. A 2-5 second delay after triggering before entering standby mode prevents recording from stopping before the target leaves.
Trigger Delay: This is the interval between the sensor detecting a heat source and the camera starting recording. The default setting is 0.2-0.6 seconds (for mainstream models) and does not require adjustment. (Too short can lead to false triggers, while too long can lead to missed images of fast-moving animals.)
Infrared Night Vision and Energy Saving Settings
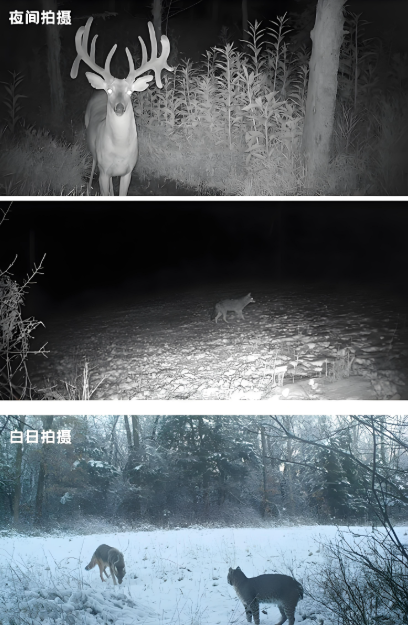
Infrared Illumination Activation Time: Select "Auto Switch" (uses visible light in color during the day, automatically activates the infrared illuminator when light levels fall below 10 lux, and records in black and white at night). This prevents manual settings from failing to trigger night vision in low light.
Energy Saving Mode: Enable "Low Power Standby" (the sensor consumes only microamps of current when in standby mode). If using battery power, disable features like "Live Preview" and "Always-On WiFi" (this can extend battery life by 30%-50%) to ensure continuous and stable sensor operation. 3. Installation and Debugging: Accurately Target the Sensor with the Target Activity Area
The installation location and angle directly determine whether the sensor can detect wildlife. Planning should be based on the target's habits and environmental characteristics to avoid obstructions or angle deviation.
Site Selection Principle: Target frequent animal activity paths
Prioritize locations with "natural pathways": such as forest trails, the edges of water sources, and rock crevices (where animals drink and forage), or near footprints in the snow and scratches on tree trunks (indicating animal activity).
Avoid interference sources: Stay away from roads (where vehicle heat can cause false triggers), areas with human activity (such as farmhouses and trails), and areas with strong heat sources (such as hot springs and campfires). Also, avoid facing the sensor directly into the sun (where strong daylight can interfere with temperature difference detection) or facing the wind (where strong winds can cause swaying vegetation to cause false triggers). Mounting Angle and Height: Match the target's size.
Height: When monitoring small or medium-sized ground-dwelling animals (such as foxes and wild boars), keep the camera base 0.5-1 meter above the ground. When monitoring large animals (such as deer and bison) or those that live in trees (such as monkeys and squirrels), raise the camera to 1.2-2 meters to ensure the sensor's detection range covers the target's primary heat source (the trunk, not the limbs).
Angle: The sensor lens should be tilted 15-30 degrees above the ground (avoid pointing it upward or close to the ground to reduce interference from glare from the sky or weeds). Ensure there are no obstructions within 3-5 meters of the lens (such as branches and weeds to prevent the animal from entering the target area).
Securing Method: Use cable ties to secure the camera to a tree trunk (≥10 cm in diameter to prevent movement caused by swaying branches) or a metal bracket. Ensure the camera is not tilted or loose, and that the sensor's detection direction is perpendicular to the animal's path (for example, install it horizontally along a trail, not along it). Field Testing: Verify Triggering and Fine-tune
Simulated Trigger Test: After installation, have a person slowly walk through the sensor's detection range at three distances (simulating animal movement speed, approximately 1-2 meters per second) within its detection range. Observe whether the camera triggers the image. If the sensor only triggers at close range, increase the long-range setting. If it does not trigger, check whether the sensor is obstructed and whether the battery is functioning properly.
False Trigger Troubleshooting: After testing, wait 1-2 hours and check the memory card for images that were not triggered by animals (such as swaying branches or birds flying). If false triggers are frequent, adjust the sensitivity, narrow the detection angle, or install a false trigger shield 1 meter in front of the sensor (using cardboard to cover the edges, leaving only the core detection area).

Post-Maintenance: Ensure Long-Term Stable Sensor Operation
Field environments are complex, requiring regular equipment inspections to prevent sensor failures due to power, storage, or hardware failures. Regular Inspections: Adjust the frequency based on the environment.
Short-term monitoring (less than one month): Perform an inspection every two weeks to replace the battery, export data, and check the sensor lens for dust and rain damage (wipe with a dry cloth to avoid damaging the coating with alcohol).
Long-term monitoring (over three months): Perform a monthly inspection to check whether the solar panel is covered with fallen leaves (clear debris to ensure efficient charging), whether the bracket is loose (re-secure it to prevent camera movement), and whether the memory card is full (set the "loop overwrite" function to avoid stopping recording due to insufficient storage space).
Data Feedback: Optimize Parameter Settings

If the data contains a high number of missed shots (e.g., only capturing the tail of an animal): Reduce the sensor's detection range, increase the sensitivity, or adjust the mounting angle so the lens faces the direction of the animal.
If false triggers are frequent (e.g., a large number of empty shots): Reduce the sensitivity, narrow the detection angle, or relocate the sensor to avoid areas with dense vegetation or strong winds.


